こんにちは。エムスリーエンジニアリンググループのコンシューマチームでアーキテクトをしている園田です。 本日はコンシューマチームのブログリレー 4 日目です。
前回の記事で「Amplify Gen2 ってなんだ?」って書いていたんですけど、その直後に Amplify Gen 2 についての公式アナウンスがありました。
さっそく Gen 2 を試してみたので今回はそのときの手順を書いています。 ちなみに、所感としては従来の Amplify が CloudFormation だとすると Gen 2 が CDK ってイメージです(伝わらないか)。
とてもニッチな上に、かなり殴り書きに近い文章で読みづらいかもしれませんが、どなたかの参考になれば幸いです。
- Amplify プロジェクトの初期化
- サンドボックス環境の構築
- フロントエンド実装
- デプロイ
- なんとか Astro を動かしたい
- まとめ
- トラブルシューティング
- We are hiring
Amplify プロジェクトの初期化
公式ドキュメントの QuickStart の手順で実施します。 公式ドキュメントでは Next.js のプロジェクトをサンプルとしていますが、 前回つくった Astro SSR のプロジェクトがあるので、こちらを Gen 2 に対応させてみました。
執筆時点 (2023/11/24) では、公式ドキュメントにいくつか不足があるので、それらの対処方法も記載しています。
既存のプロジェクトを Amplify Gen 2 プロジェクトにするには、プロジェクトルートで以下のコマンドを実行します。
npm create amplify@latest # yarn でも OK
なお、本記事で利用した
create-amplifyのバージョンは0.3.8です。
現在のディレクトリ . を Amplify プロジェクトにするか聞かれるので空エンターします。
? Where should we create your project? .
package.json に依存関係が追加され、amplify ディレクトリが作成されます。
この時点ではローカルの変更のみで、AWS 上にリソースはできません。
Installing required dependencies...
Creating template files...
Successfully created a new project!
Welcome to AWS Amplify!
Run `npx amplify help` for a list of available commands.
Get started by running `npx amplify sandbox`.
Amplify (Gen 2) collects anonymous telemetry data about general usage of the CLI.

Participation is optional, and you may opt-out by using `amplify configure telemetry disable`.

To learn more about telemetry, visit https://docs.amplify.aws/gen2/reference/telemetry
Amplify プロジェクトが作成されると、amplify ディレクトリの中に以下の 3 つの TypeScript ファイルが生成されています。
amplify/backend.tsamplify/auth/resource.tsamplify/data/resource.ts
amplify/backend.ts
// amplify/backend.ts
import { defineBackend } from '@aws-amplify/backend';
import { auth } from './auth/resource.js';
import { data } from './data/resource.js';

defineBackend({
    auth,
    data,
});
amplify/backend.ts はバックエンド定義のエントリポイントとなるファイルで、定義された auth と data を import してバックエンド環境として宣言しています。
amplify/auth/resource.ts
// amplify/auth/resource.ts
import { defineAuth } from '@aws-amplify/backend';

/**
 * Define and configure your auth resource
 * When used alongside data, it is automatically configured as an auth provider for data
 * @see https://docs.amplify.aws/gen2/build-a-backend/auth
 */
export const auth = defineAuth({
    loginWith: {
        email: true,
        // add social providers
        externalProviders: {
            /**
             * first, create your secrets using `amplify sandbox secret`
             * then, import `secret` from `@aws-amplify/backend`
             * @see https://docs.amplify.aws/gen2/deploy-and-host/sandbox-environments/features/#setting-secrets
             */
            // loginWithAmazon: {
            //   clientId: secret('LOGINWITHAMAZON_CLIENT_ID'),
            //   clientSecret: secret('LOGINWITHAMAZON_CLIENT_SECRET'),
            // }
        },
    },
    /**
     * enable multifactor authentication
     * @see https://docs.amplify.aws/gen2/build-a-backend/auth/manage-mfa
     */
    // multifactor: {
    //   mode: 'OPTIONAL',
    //   sms: {
    //     smsMessage: (code) => `Your verification code is ${code}`,
    //   },
    // },
    userAttributes: {
        /** request additional attributes for your app's users */
        // profilePicture: {
        //   mutable: true,
        //   required: false,
        // },
    },
});
従来の Amplify を知っているとすぐわかると思いますが、amplify/auth/resource.ts は Cognito UserPool のリソース定義です。
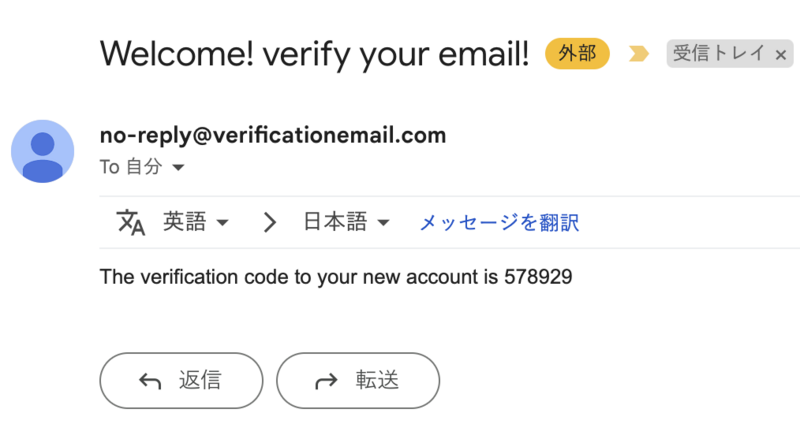
このソースコードからは、このプロジェクトではメールアドレスでのサインインをサポートしていることがわかります。 QuickStart では以下のようにサインアップ時の検証メールタイトルを変更しているので、例にならって変更します。
  export const auth = defineAuth({
      loginWith: {
-         email: true,
+         email: {
+             verificationEmailSubject: 'Welcome! verify your email!',
+         },
ちなみにデフォルトだと Verify your new account というタイトルです。
amplify/data/resource.ts
// amplify/data/resource.ts
import { type ClientSchema, a, defineData } from '@aws-amplify/backend';

/*== STEP 1 ===============================================================
The section below creates a Todo database table with a "content" field. Try
adding a new "isDone" field as a boolean. The authorization rules below
specify that owners, authenticated via your Auth resource can "create",
"read", "update", and "delete" their own records. Public users,
authenticated via an API key, can only "read" records.
=========================================================================*/
const schema = a.schema({
    Todo: a
        .model({
            content: a.string(),
        })
        .authorization([a.allow.owner(), a.allow.public().to(['read'])]),
});

export type Schema = ClientSchema<typeof schema>;

export const data = defineData({
    schema,
    authorizationModes: {
        defaultAuthorizationMode: 'apiKey',
        // API Key is used for a.allow.public() rules
        apiKeyAuthorizationMode: {
            expiresInDays: 30,
        },
    },
});

/*== STEP 2 ===============================================================
Go to your frontend source code. From your client-side code, generate a
Data client to make CRUDL requests to your table. (THIS SNIPPET WILL ONLY
WORK IN THE FRONTEND CODE FILE.)

Using JavaScript or Next.js React Server Components, Middleware, Server
Actions or Pages Router? Review how to generate Data clients for those use
cases: https://docs.amplify.aws/gen2/build-a-backend/data/connect-to-API/
=========================================================================*/

/*
"use client"
import { generateClient } from "aws-amplify/data";
import { type Schema } from "@/amplify/data/resource";

const client = generateClient<Schema>() // use this Data client for CRUDL requests
*/

/*== STEP 3 ===============================================================
Fetch records from the database and use them in your frontend component.
(THIS SNIPPET WILL ONLY WORK IN THE FRONTEND CODE FILE.)
=========================================================================*/

/* For example, in a React component, you can use this snippet in your
  function's RETURN statement */
// const { data: todos } = client.models.Todo.list()

// return <ul>{todos.map(todo => <li key={todo.id}>{todo.content}</li>)}</ul>
続いて amplify/data/resource.ts は GraphQL API のモデル定義です。
こちらのソースコードでは content という文字列フィールドを持つ Todo というモデルを定義しています。
従来の Amplify では ID フィールドなども定義していましたが、Gen 2 では自動で生成されるようです。
DynamoDB のテーブルを直接参照すると、他にも createdAt や owner などのフィールドも自動で生成されていました。
他にもこのコードからは以下のことが読み取れます。
- Todo モデルは作成者本人(owner)による CRUD が可能
- Todo モデルは Anonymous ユーザーによる読み取りが可能
- API の認証は API Key による認証
- API キーの期限は 30 日
Amplify における「モデル」とはざっくりいうと DynamoDB テーブル定義とそれを表す AppSync GraphQL スキーマです。Amplify ではさらにはそれらを CRUD 操作するための GraphQL Resolver まで自動で生成されます。これは従来からの機能です。
こちらのソースコードも QuickStart にならって修正します。
まず、Todo モデルに done と priority というフィールドを追加します。
  const schema = a.schema({
      Todo: a
          .model({
              content: a.string(),
+             done: a.boolean(),
+             priority: a.enum(["low", "medium", "high"]),
          })
スキーマ定義のコードが zod そっくりですね。思わず a ではなく z とタイプしてしまいます。
続いて、API の認証モードを Cognito に変更します。せっかく Cognito UserPool を作成しているのに API Key を使う意味ないですからね。
  export const data = defineData({
      schema,
      authorizationModes: {
-         defaultAuthorizationMode: 'apiKey',
-         // API Key is used for a.allow.public() rules
-         apiKeyAuthorizationMode: {
-             expiresInDays: 30,
-         },
+         defaultAuthorizationMode: 'userPool',
      },
  });
で、公式ドキュメントだとこれで終わりなんですが、このままだと実行時エラーになるので以下の修正をします。
  const schema = a.schema({
      Todo: a
          .model({
              content: a.string(),
          })
-         .authorization([a.allow.owner(), a.allow.public().to(['read'])]),
+         .authorization([a.allow.owner(), a.allow.public("iam").to(['read'])]),
  });
a.allow.public の引数はデフォルトだと apiKey になるようで、iam を明示しないとエラーになりました(上の修正で API Key をやめているので)。
従来の Amplify では、リソースの定義はソースコードではなく、複数の json ファイルとして存在しており、cli 経由でそれらを編集していましたが、コードファーストとなったことでより直感的になった気がします。
サンドボックス環境の構築
プロジェクトが作成されたら sandbox を起動します。 この sandbox が Gen 2 の目玉機能の 1 つで、開発者ごとに用意される AWS の実環境です。 LocalStack のようなエミュレーション環境ではなく、実際のバックエンドリソース一式が開発者ごとに構築されるイメージです。
公式ドキュメントや、プロジェクト初期化時のコンソール出力にあるとおり、以下のコマンドで起動しますが、初回はこれだけだと起動しませんでした。
npx amplify sandbox
最終的に実行したコマンドは以下になります。詳しくはトラブルシューティング/sandbox起動時に記載してあります。
# AWS クレデンシャルの設定
export AWS_ACCESS_KEY_ID=xxxxxxxxxxx
export AWS_SECRET_ACCESS_KEY=xxxxxxxxxxx
export AWS_SESSION_TOKEN=xxxxxxxxxxxx

# 不足している依存関係の追加
npm install --save-dev aws-cdk-lib constructs

# cdk cli の最新化
npm install --global aws-cdk@latest

# sandbox 起動の呪文!
npx amplify sandbox
初回実行時に AWS リソースを構築するので時間が(5〜6分)かかりますが、気長に待ちます。
amplify sandbox 実行時ログ
[Sandbox] Initializing...
[Sandbox] Executing command `deploy`

✨  Synthesis time: 4.26s

⚠️ The --hotswap and --hotswap-fallback flags deliberately introduce CloudFormation drift to speed up deployments
⚠️ They should only be used for development - never use them for your production Stacks!

amplify-amplifyastrossrexample-ryoheisonoda-sandbox-02480437c2: deploying... [1/1]

⚠️ The following non-hotswappable changes were found:
    logicalID: deploymentType, type: Stack Output, reason: output was changed
    logicalID: region, type: Stack Output, reason: output was changed
    logicalID: userPoolId, type: Stack Output, reason: output was changed
    logicalID: webClientId, type: Stack Output, reason: output was changed
    logicalID: identityPoolId, type: Stack Output, reason: output was changed
    logicalID: authRegion, type: Stack Output, reason: output was changed
    logicalID: signupAttributes, type: Stack Output, reason: output was changed
    logicalID: usernameAttributes, type: Stack Output, reason: output was changed
    logicalID: verificationMechanisms, type: Stack Output, reason: output was changed
    logicalID: passwordPolicyMinLength, type: Stack Output, reason: output was changed
    logicalID: passwordPolicyRequirements, type: Stack Output, reason: output was changed
    logicalID: awsAppsyncApiId, type: Stack Output, reason: output was changed
    logicalID: awsAppsyncApiEndpoint, type: Stack Output, reason: output was changed
    logicalID: awsAppsyncAuthenticationType, type: Stack Output, reason: output was changed
    logicalID: awsAppsyncRegion, type: Stack Output, reason: output was changed
    logicalID: amplifyApiModelSchemaS3Uri, type: Stack Output, reason: output was changed
    logicalID: awsAppsyncAdditionalAuthenticationTypes, type: Stack Output, reason: output was changed
    logicalID: auth179371D7, type: AWS::CloudFormation::Stack, reason: physical name for AWS::CloudFormation::Stack 'auth179371D7' could not be found in CloudFormation, so this is a newly created nested stack and cannot be hotswapped
    logicalID: data7552DF31, type: AWS::CloudFormation::Stack, reason: physical name for AWS::CloudFormation::Stack 'data7552DF31' could not be found in CloudFormation, so this is a newly created nested stack and cannot be hotswapped
    logicalID: CDKMetadata, type: AWS::CDK::Metadata, reason: resource 'CDKMetadata' was created by this deployment

Could not perform a hotswap deployment, as the stack amplify-amplifyastrossrexample-ryoheisonoda-sandbox-02480437c2 contains non-Asset changes
Falling back to doing a full deployment
amplify-amplifyastrossrexample-ryoheisonoda-sandbox-02480437c2: creating stack...
amplify-amplifyastrossrexample-ryoheisonoda-sandbox-02480437c2-auth179371D7-DL3QAQDVBYWA |   0 | 1:26:26 PM | CREATE_IN_PROGRESS   | AWS::CloudFormation::Stack | amplify-amplifyastrossrexample-ryoheisonoda-sandbox-02480437c2-auth179371D7-DL3QAQDVBYWA User Initiated
amplify-amplifyastrossrexample-ryoheisonoda-sandbox-02480437c2 |   0 | 1:26:21 PM | CREATE_IN_PROGRESS   | AWS::CloudFormation::Stack | amplify-amplifyastrossrexample-ryoheisonoda-sandbox-02480437c2 User Initiated
amplify-amplifyastrossrexample-ryoheisonoda-sandbox-02480437c2 |   0 | 1:26:25 PM | CREATE_IN_PROGRESS   | AWS::CloudFormation::Stack | auth.NestedStack/auth.NestedStackResource (auth179371D7)
amplify-amplifyastrossrexample-ryoheisonoda-sandbox-02480437c2 |   0 | 1:26:25 PM | CREATE_IN_PROGRESS   | AWS::CDK::Metadata         | auth/CDKMetadata/Default (CDKMetadata)
amplify-amplifyastrossrexample-ryoheisonoda-sandbox-02480437c2 |   0 | 1:26:26 PM | CREATE_IN_PROGRESS   | AWS::CloudFormation::Stack | auth.NestedStack/auth.NestedStackResource (auth179371D7) Resource creation Initiated
amplify-amplifyastrossrexample-ryoheisonoda-sandbox-02480437c2 |   0 | 1:26:26 PM | CREATE_IN_PROGRESS   | AWS::CDK::Metadata         | auth/CDKMetadata/Default (CDKMetadata) Resource creation Initiated
amplify-amplifyastrossrexample-ryoheisonoda-sandbox-02480437c2 |   1 | 1:26:27 PM | CREATE_COMPLETE      | AWS::CDK::Metadata         | auth/CDKMetadata/Default (CDKMetadata)
  1 Currently in progress: amplify-amplifyastrossrexample-ryoheisonoda-sandbox-02480437c2-auth179371D7-DL3QAQDVBYWA, amplify-amplifyastrossrexample-ryoheisonoda-sandbox-02480437c2, auth179371D7
amplify-amplifyastrossrexample-ryoheisonoda-sandbox-02480437c2-data7552DF31-1QVDVNTI2WJZA |   1 | 1:27:01 PM | CREATE_IN_PROGRESS   | AWS::CloudFormation::Stack | amplify-amplifyastrossrexample-ryoheisonoda-sandbox-02480437c2-data7552DF31-1QVDVNTI2WJZA User Initiated
amplify-amplifyastrossrexample-ryoheisonoda-sandbox-02480437c2 |   2 | 1:27:00 PM | CREATE_COMPLETE      | AWS::CloudFormation::Stack | auth.NestedStack/auth.NestedStackResource (auth179371D7)
amplify-amplifyastrossrexample-ryoheisonoda-sandbox-02480437c2 |   2 | 1:27:00 PM | CREATE_IN_PROGRESS   | AWS::CloudFormation::Stack | data.NestedStack/data.NestedStackResource (data7552DF31)
amplify-amplifyastrossrexample-ryoheisonoda-sandbox-02480437c2 |   2 | 1:27:01 PM | CREATE_IN_PROGRESS   | AWS::CloudFormation::Stack | data.NestedStack/data.NestedStackResource (data7552DF31) Resource creation Initiated
  2 Currently in progress: amplify-amplifyastrossrexample-ryoheisonoda-sandbox-02480437c2-auth179371D7-DL3QAQDVBYWA, amplify-amplifyastrossrexample-ryoheisonoda-sandbox-02480437c2, amplify-amplifyastrossrexample-ryoheisonoda-sandbox-02480437c2-data7552DF31-1QVDVNTI2WJZA, data7552DF31
amplify-amplifyastrossrexample-ryoheisonoda-sandbox-02480437c2 |   3 | 1:31:04 PM | CREATE_COMPLETE      | AWS::CloudFormation::Stack | data.NestedStack/data.NestedStackResource (data7552DF31)
amplify-amplifyastrossrexample-ryoheisonoda-sandbox-02480437c2 |   4 | 1:31:05 PM | CREATE_COMPLETE      | AWS::CloudFormation::Stack | amplify-amplifyastrossrexample-ryoheisonoda-sandbox-02480437c2

 ✅  amplify-amplifyastrossrexample-ryoheisonoda-sandbox-02480437c2

✨  Deployment time: 286.16s

Outputs:
amplify-amplifyastrossrexample-ryoheisonoda-sandbox-02480437c2.amplifyApiModelSchemaS3Uri = s3://amplify-amplifyastrossrex-amplifydataamplifycodege-7dhstykqo8kc/model-schema.graphql
amplify-amplifyastrossrexample-ryoheisonoda-sandbox-02480437c2.authRegion = ap-northeast-1
amplify-amplifyastrossrexample-ryoheisonoda-sandbox-02480437c2.awsAppsyncAdditionalAuthenticationTypes = AWS_IAM
amplify-amplifyastrossrexample-ryoheisonoda-sandbox-02480437c2.awsAppsyncApiEndpoint = https://oxo3selt4fa7djfxlo2s5dpr4q.appsync-api.ap-northeast-1.amazonaws.com/graphql
amplify-amplifyastrossrexample-ryoheisonoda-sandbox-02480437c2.awsAppsyncApiId = ya3no77kdvdgjchzsccloivwta
amplify-amplifyastrossrexample-ryoheisonoda-sandbox-02480437c2.awsAppsyncAuthenticationType = AMAZON_COGNITO_USER_POOLS
amplify-amplifyastrossrexample-ryoheisonoda-sandbox-02480437c2.awsAppsyncRegion = ap-northeast-1
amplify-amplifyastrossrexample-ryoheisonoda-sandbox-02480437c2.deploymentType = sandbox
amplify-amplifyastrossrexample-ryoheisonoda-sandbox-02480437c2.identityPoolId = ap-northeast-1:276bcce8-347e-4b81-98cf-9403b48ebaf3
amplify-amplifyastrossrexample-ryoheisonoda-sandbox-02480437c2.passwordPolicyMinLength = 8
amplify-amplifyastrossrexample-ryoheisonoda-sandbox-02480437c2.passwordPolicyRequirements = ["REQUIRES_NUMBERS","REQUIRES_LOWERCASE","REQUIRES_UPPERCASE","REQUIRES_SYMBOLS"]
amplify-amplifyastrossrexample-ryoheisonoda-sandbox-02480437c2.region = ap-northeast-1
amplify-amplifyastrossrexample-ryoheisonoda-sandbox-02480437c2.signupAttributes = ["EMAIL"]
amplify-amplifyastrossrexample-ryoheisonoda-sandbox-02480437c2.userPoolId = ap-northeast-1_kT9kwCagh
amplify-amplifyastrossrexample-ryoheisonoda-sandbox-02480437c2.usernameAttributes = ["EMAIL"]
amplify-amplifyastrossrexample-ryoheisonoda-sandbox-02480437c2.verificationMechanisms = ["EMAIL"]
amplify-amplifyastrossrexample-ryoheisonoda-sandbox-02480437c2.webClientId = 58esg1i68k922kdvna6sorn4q
Stack ARN:
arn:aws:cloudformation:ap-northeast-1:876415080657:stack/amplify-amplifyastrossrexample-ryoheisonoda-sandbox-02480437c2/746a10c0-89b8-11ee-ba29-06d1078ab789

✨  Total time: 290.42s


[Sandbox] Running successfulDeployment event handlers
[Sandbox] Watching for file changes...
これで sandbox 環境が起動した状態になっています。開発中はこのプロセスは終了せずに起動しっぱなしにしておく必要があります。
また、初回 sandbox 起動時にプロジェクトルートに amplifyconfiguration.json という .gitignore 対象のファイルが生成されます。
こちらは従来の Amplify でいう aws-exports.js みたいなもので、Amplify のクライアントを利用する際に必要になるので、フロントエンド実装前に初回起動をすませておくことを推奨します。
なお、構築した sandbox 環境は以下のコマンドで削除できます。
npx amplify sandbox delete
フロントエンド実装
sandbox コマンドで開発用のバックエンド環境が構築されたので、続いてフロントエンドを実装します。 今回は公式ドキュメントの QuickStart を参考にしているので UI フレームワークとして React を使用します。
Astro に React のインテグレーションを追加します。
yarn astro add react
yarn astro add react ログ
✔ Resolving packages...

  Astro will run the following command:
  If you skip this step, you can always run it yourself later

 ╭─────────────────────────────────────────────────────────────────────────────────────────────────────────╮
 │ yarn add @astrojs/react @types/react-dom@^18.0.6 @types/react@^18.0.21 react-dom@^18.0.0 react@^18.0.0  │
 ╰─────────────────────────────────────────────────────────────────────────────────────────────────────────╯

✔ Continue? … yes
✔ Installing dependencies...

  Astro will make the following changes to your config file:

 ╭ astro.config.mjs ─────────────────────────────╮
 │ import { defineConfig } from 'astro/config';  │
 │ import node from "@astrojs/node";             │
 │                                               │
 │ import react from "@astrojs/react";           │
 │                                               │
 │ // https://astro.build/config                 │
 │ export default defineConfig({                 │
 │   output: "server",                           │
 │   adapter: node({                             │
 │     mode: "standalone"                        │
 │   }),                                         │
 │   integrations: [react()]                     │
 │ });                                           │
 ╰───────────────────────────────────────────────╯

✔ Continue? … yes

   success  Added the following integration to your project:
  - @astrojs/react

  Astro will make the following changes to your tsconfig.json:

 ╭ tsconfig.json ──────────────────────────╮
 │ {                                       │
 │   "extends": "astro/tsconfigs/strict",  │
 │   "compilerOptions": {                  │
 │     "jsx": "react-jsx",                 │
 │     "jsxImportSource": "react"          │
 │   }                                     │
 │ }                                       │
 ╰─────────────────────────────────────────╯

✔ Continue? … yes

   success  Successfully updated TypeScript settings
✨  Done in 43.42s.
続いて Amplify のサインインやサインアップなどの UI コンポーネント詰め合わせである @aws-amplify/ui-react をインストールします。
これがなくても UI 実装はできますが、あったほうが圧倒的に楽です。
yarn add @aws-amplify/ui-react
では最初のファイルを作りましょう。公式の QuickStart は Next.js 前提になっていますが、素の React でもできます。 以下が公式の QuickStart にあるソースコードです。
// pages/_app.tsx
import { withAuthenticator } from '@aws-amplify/ui-react';
import { Amplify } from 'aws-amplify';
import config from '@/amplifyconfiguration.json';
import '@aws-amplify/ui-react/styles.css';
import type { AppProps } from 'next/app';

// configure the Amplify client library with the configuration generated by `amplify sandbox`
Amplify.configure(config);

function App({ Component, pageProps }: AppProps) {
  return <Component {...pageProps} />;
}

export default withAuthenticator(App);
素の React にするとこうなります。ファイル名も変更します。
amplifyconfiguration.json の位置(相対パス)に注意してください。
// src/components/App.tsx
import { withAuthenticator } from '@aws-amplify/ui-react';
import { Amplify } from 'aws-amplify';
import config from '../../amplifyconfiguration.json';
import type { ReactNode } from "react";
import '@aws-amplify/ui-react/styles.css';

Amplify.configure(config);

function App({ children }: { children: ReactNode }) {
  return <>{children}</>;
}

export default withAuthenticator(App);
amplifyconfiguration.jsonは sandbox 起動時に生成されます。 まだ生成されていない場合は先に sandbox の起動を行ってください。
続いて TodoList コンポーネントを作成します。
amplify ディレクトリの位置(相対パス)に注意してください。
以下はほぼ公式のコピペです(importのパスだけ違う)。
// src/components/TodoList.tsx
import { useState, useEffect } from 'react';
import { generateClient } from 'aws-amplify/data';
import type {Schema} from '../../amplify/data/resource';

// generate your data client using the Schema from your backend
const client = generateClient<Schema>();

export default function TodoList() {
    const [todos, setTodos] = useState<Schema['Todo'][]>([]);

    useEffect(() => {
        const sub = client.models.Todo.observeQuery()
            .subscribe(({ items }) => setTodos([...items]))

        return () => sub.unsubscribe()
    }, []);

    return (
        <main>
            <h1>Hello, Amplify 👋</h1>

            <button onClick={async () => {
                // create a new Todo with the following attributes
                const { errors, data: newTodo } = await client.models.Todo.create({
                    // prompt the user to enter the title
                    content: window.prompt("title"),
                    done: false,
                    priority: 'medium'
                })
                console.log(errors, newTodo);
            }}>Create </button>

            <ul>
                {todos.map((todo) => (
                    <li key={todo.id}>{todo.content}</li>
                ))}
            </ul>
        </main>
    );
}
追加した
doneとpriorityは使わないの?と思うかもしれません。自分も思いました。しかしながら公式ドキュメントではフロントエンドコードにそれらは出てきません。
最後に Astro ページを実装して起動してみます。
---
// pages/todo.astro
import Layout from "../layouts/Layout.astro";
import App from "../components/App.tsx";
import TodoList from "../components/TodoList.tsx";
---

<Layout title="Amplify Gen 2">
    <main>
        <App client:only="react">
            <TodoList client:only="react" />
        </App>
    </main>
</Layout>

<style>
    main {
        margin: auto;
        width: 800px;
        color: white;
    }
</style>
ターミナルセッションを 2 つ開き、そのうちの 1 つで以下のコマンドを実行しておきます。
yarn amplify sandbox
もう 1 つのセッションで Astro を起動します。
yarn run dev
この状態で http://localhost:4321/todo にアクセスすると、ログイン画面が表示されました。
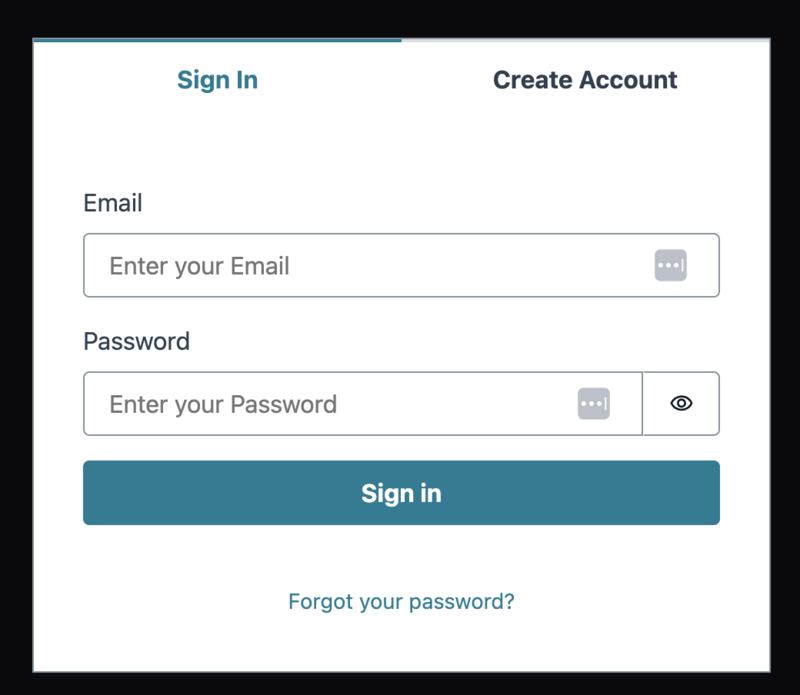
App.tsx にある withAuthenticator で作成した高階コンポーネントが自動でセッションの有無を判断して、未ログインであればログイン画面を表示してくれます。
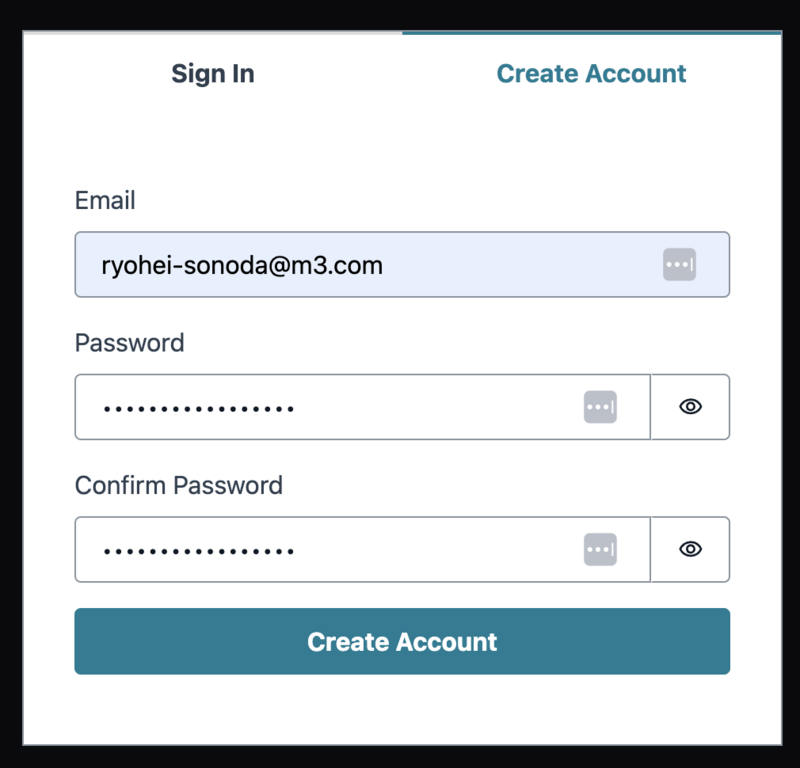
アカウントをサインアップして、ログインしてみます。
ちゃんと設定したタイトルでメールが来てます。
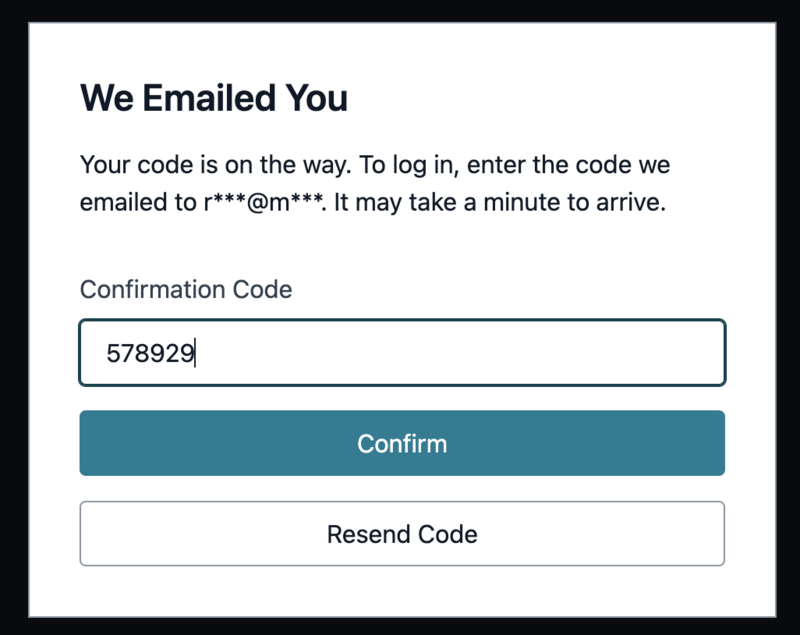
メールに記載された認証コードでサインアップができました。

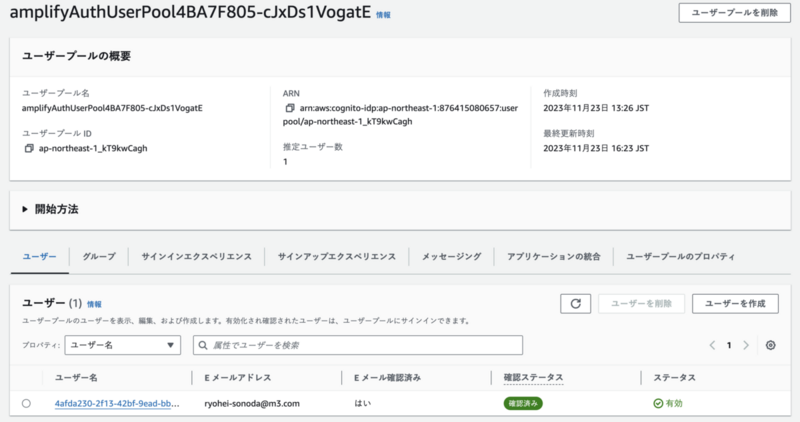
マネジメントコンソールで Cognito UserPool を確認すると、ユーザーが登録されていました。
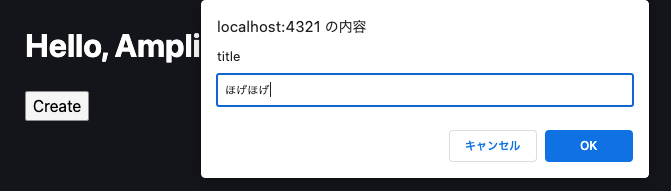
試しに Todo を追加してみます。
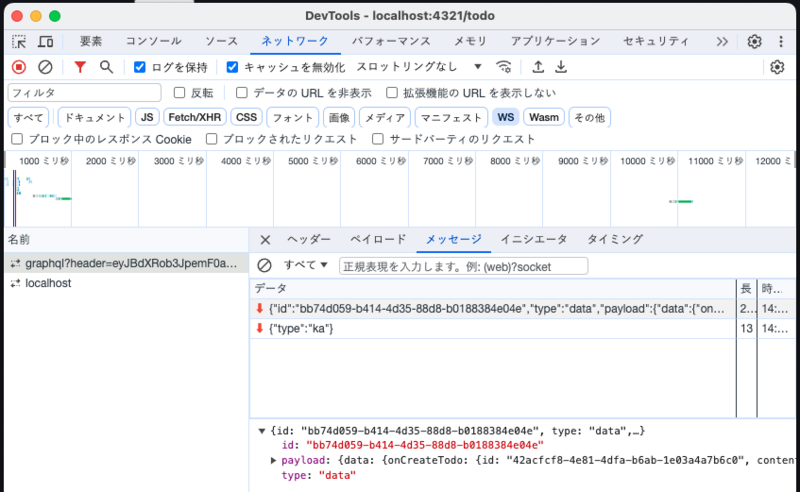
追加した瞬間、即座にリストが変更されました。

実際には WebSocket で Amplify の更新イベントを受信しています。
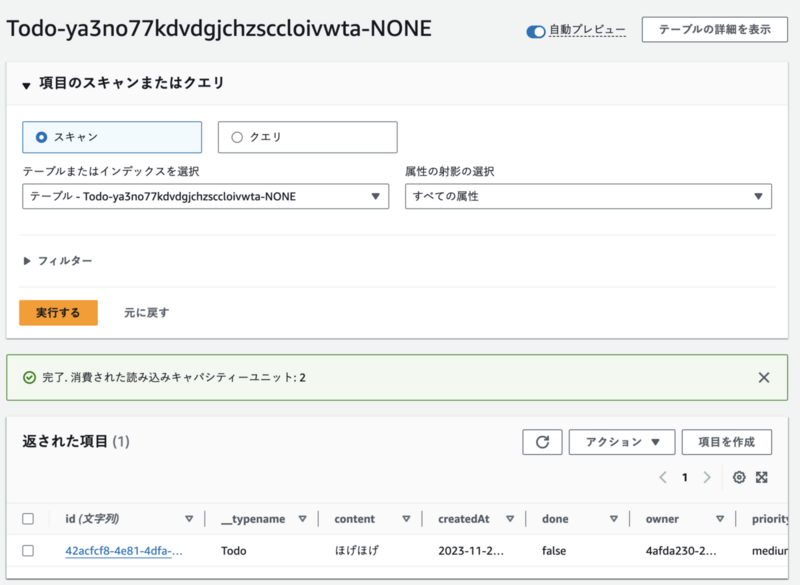
DynamoDB のテーブルを見ると、データが追加されていることがわかります。
ここまででいったんフロントエンドの実装は完了して、次はデプロイを行います。
デプロイ
Amplify Gen 2 は Git リポジトリからのデプロイにのみ対応しています。
マネジメントコンソールで Amplify のページを開き、Gen 2 の Create an app ボタンを押します。

「オプション 2: 既存のアプリケーションを使用して開始」で「GitHub」を選択します。

リポジトリとブランチを選択して、いざデプロイ!
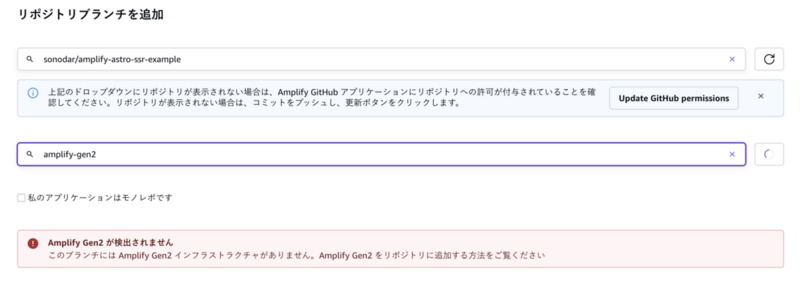
なんと、認識してくれませんでした!
どうやら自動認識できるフレームワークが決まっていて、Astro は自動認識対象外だから認識してくれないようです。 どうせパイプラインは自分で書くんだから、フレームワークの自動認識はしてくれなくていいのに、と思いました。
普通のやってみた記事ならここで終わりですが、その後もちょっと悪あがきしてみました。
なんとか Astro を動かしたい
自動認識されないだけで、ブランチが登録できればビルド手順とかカスタマイズしてデプロイできるのでは? と思い、 いったん Next で作り直して、ブランチを登録したあとに Astro にしたらどうなるかやってみました。
migrate to next · sonodar/amplify-astro-ssr-example@48f0acb · GitHub
この状態で push したら、ちゃんと認識してくれました。Next だけ特別感がすごいですね。
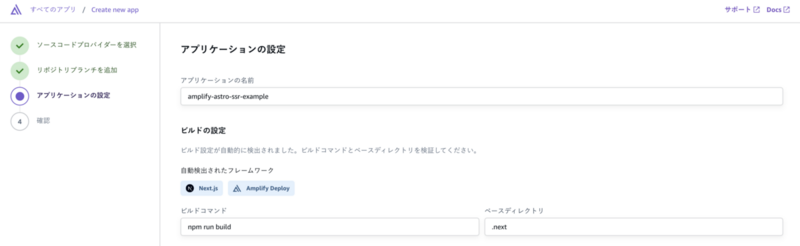
あとで Astro 化するときのために念のため AmazonLinux 2023 のイメージと Nodejs 20 を指定しておきます。

Next に作り替えたら、もうびっくりするくらいすんなりデプロイできました。

この状態で、Next 化のコミットを Revert して再度 Astro にして push してみました。 すると目論見どおり、ちゃんとデプロイパイプラインが起動しました。でもやはりエラーになりました。
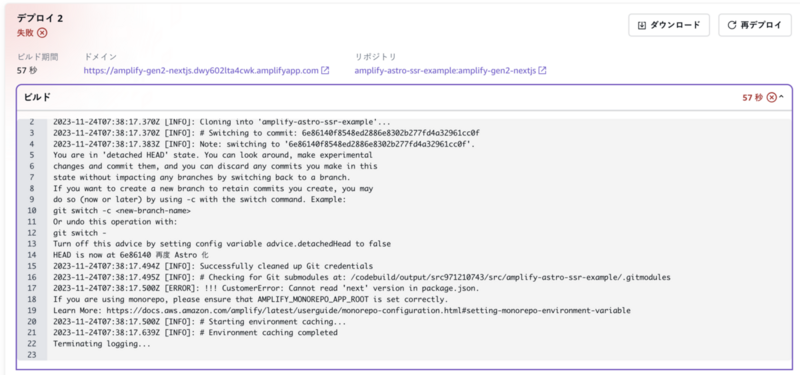
2023-11-24T07:38:17.500Z [ERROR]: !!! CustomerError: Cannot read 'next' version in package.json.
package.json に next がないってエラーになっているので、使わないけど next 追加したらどうなるかやってみました。
npm install next
するとなんということでしょう、Next プロジェクトだと誤解してビルドパイプラインが起動し、ビルドフェーズまで進みました。
2023-11-24T07:47:34.159Z [WARNING]: Node.js v14.21.3 is not supported by Astro!
Please upgrade Node.js to a supported version: ">=18.14.1"
おっと、nodejs のライブバージョン指定が効いていないようです。ビルドプロセスで明示的に nvm use 18 を実行するように修正しました。
nvm use 18 · sonodar/amplify-astro-ssr-example@b69022a · GitHub
で、push ...
2023-11-24T07:50:50.974Z [WARNING]: [astro:build] The package "@esbuild/linux-x64" could not be found, and is needed by esbuild.
If you are installing esbuild with npm, make sure that you don't specify the
"--no-optional" or "--omit=optional" flags. The "optionalDependencies" feature
of "package.json" is used by esbuild to install the correct binary executable
for your current platform.
file: /codebuild/output/src2706574073/src/amplify-astro-ssr-example/node_modules/astro/components/Image.astro
今度は @esbuild/linux-x64 が見つからないと。こちらもビルドプロセスでインストールするようにして再チャレンジ。
add @esbuild/linux-x64 · sonodar/amplify-astro-ssr-example@0c044cc · GitHub
お次はこのエラーです。
2023-11-24T08:19:03.156Z [WARNING]: Could not resolve "../../amplifyconfiguration.json" from "src/components/App.tsx"
これは Amplify Gen 1 のときにも散々見たエラー(Could not resolve "aws-exports.js")ですね。
本来ならビルドプロセスの中で勝手に生成されるのですが、どうやら amplify:al2023 のビルドイメージは Amplify Gen 1 用のイメージで、Gen 2 には対応していないようです。
なので成功したときのビルドログを参考にビルドプロセスで以下を実行するようにしました。
npx amplify pipeline-deploy --branch $AWS_BRANCH --app-id $AWS_APP_ID
add deploy command · sonodar/amplify-astro-ssr-example@37bc203 · GitHub
すると、ついにビルドまで成功しました!
2023-11-24T08:48:17.728Z [INFO]: Server built in 9.03s
08:48:17 AM [build] Complete!
2023-11-24T08:48:20.702Z [INFO]: # Completed phase: build
## Completed Frontend Build
2023-11-24T08:48:20.711Z [INFO]: ## Build completed successfully
長かった・・・と思ったらデプロイに失敗していました。 ログをよく見てみるとこんな 1 文が。
2023-11-24T08:48:44.440Z [ERROR]: !!! CustomerError: Can't find required-server-files.json in build output directory
どうやら required-server-files.json というファイルが必要なようです。ざっと調べてみたらこいつは Next のビルド成果物に含まれているようで。
そりゃそうですね。Amplify は Next だと認識しているので、Next の成果物を期待するわけです。
というわけでここまで来て時間も使いすぎたので、Astro での構築は断念しました。
まとめ
- Amplify Gen 2 は従来の Amplify と比べるとコードファースト。
- 完全に TypeScript 前提なので、TypeScript の型付けがしっかりしていて DX が良い。
- Function や Storage などにはまだ未対応なので本番適用はまだ不可能なレベル。
- フロントエンドが完全に Next を前提としているため他のフレームワークはまだ構築できない。
トラブルシューティング
sandbox起動時
InvalidDirectiveError: @auth directive with 'apiKey' provider found, but the project has no API Key authentication provider configured.
[SynthError]: Unable to build Amplify backend. Check your backend definition in the `amplify` folder.
Caused By: /Users/ryohei-sonoda/git/sonodar/amplify-astro-ssr-example/node_modules/@aws-amplify/graphql-api-construct/node_modules/@aws-amplify/graphql-auth-transformer/lib/utils/validations.js:37
        throw new graphql_transformer_core_1.InvalidDirectiveError(`@auth directive with 'apiKey' provider found, but the project has no API Key authentication provider configured.`);
              ^


InvalidDirectiveError: @auth directive with 'apiKey' provider found, but the project has no API Key authentication provider configured.
本文中にも書きましたが、amplify/data/resource.ts の a.allow.public() を a.allow.public("iam") に修正します。
Failed to load default aws credentials
Failed to load default aws credentials: Could not load credentials from any providers.
To configure a new Amplify profile, use "amplify configure profile".

error Command failed with exit code 1.
info Visit https://yarnpkg.com/en/docs/cli/run for documentation about this command.
AWS クレデンシャルが見当たらないということなので、いつものおまじない。
export AWS_ACCESS_KEY_ID=xxxxxxxxxxx
export AWS_SECRET_ACCESS_KEY=xxxxxxxxxxx
export AWS_SESSION_TOKEN=xxxxxxxxxxxx
Cannot find package 'aws-cdk-lib'
[Sandbox] Initializing...
[Sandbox] Executing command `deploy`

[SynthError]: Unable to build Amplify backend. Check your backend definition in the `amplify` folder.
Caused By: node:internal/errors:490
    ErrorCaptureStackTrace(err);
    ^

Error [ERR_MODULE_NOT_FOUND]: Cannot find package 'aws-cdk-lib' imported from /Users/ryohei-sonoda/git/sonodar/amplify-astro-ssr-example/node_modules/@aws-amplify/backend/lib/engine/backend-secret/backend_secret_fetcher_provider_factory.js
    at __node_internal_captureLargerStackTrace (node:internal/errors:490:5)
    at new NodeError (node:internal/errors:399:5)
    at packageResolve (node:internal/modules/esm/resolve:889:9)
    at moduleResolve (node:internal/modules/esm/resolve:938:20)
    at defaultResolve (node:internal/modules/esm/resolve:1153:11)
    at nextResolve (node:internal/modules/esm/loader:163:28)
    at E (file:///Users/ryohei-sonoda/git/sonodar/amplify-astro-ssr-example/node_modules/tsx/dist/esm/index.mjs:13:36)
    at L (file:///Users/ryohei-sonoda/git/sonodar/amplify-astro-ssr-example/node_modules/tsx/dist/esm/index.mjs:13:1231)
    at nextResolve (node:internal/modules/esm/loader:163:28)
    at ESMLoader.resolve (node:internal/modules/esm/loader:838:30)
    at ESMLoader.getModuleJob (node:internal/modules/esm/loader:424:18)
    at ModuleWrap.<anonymous> (node:internal/modules/esm/module_job:77:40)
    at link (node:internal/modules/esm/module_job:76:36) {
  code: 'ERR_MODULE_NOT_FOUND'
}
依存関係が足りていないようです。以下を追加します。
yarn add -D aws-cdk-lib constructs
This CDK CLI is not compatible with the CDK library used by your application.
This CDK CLI is not compatible with the CDK library used by your application. Please upgrade the CLI to the latest version.
(Cloud assembly schema version mismatch: Maximum schema version supported is 34.0.0, but found 35.0.0)
cdk cli バージョン不整合のエラー。どうやら最新の cli がインストールされていないとダメっぽい。 最新版の aws-cdk の cli をインストールします。
npm install -g aws-cdk@latest
フロントエンド実行時
Uncaught TypeError: Cannot read properties of undefined (reading 'observeQuery')
Amplify.configure より前に generateClient を呼び出すと client.models の中身が空になり、 client.modeuls.Todo が undefined になります。
なので、client 生成のコードを共通化して Amplify.configure を呼ぶようにすると、こういったトラブルが防げます。
// src/client.ts
import { Amplify } from 'aws-amplify';
import config from '../amplifyconfiguration.json';
import { generateClient } from 'aws-amplify/api';
import type {Schema} from '../amplify/data/resource';

Amplify.configure(config);

export const client = generateClient<Schema>();
その他
amplify コマンドを実行する際に npx を使わずに amplify sandbox とだけ実行すると、従来の amplify cli がインストールされている環境では従来の cli が起動するため sandbox コマンドなんてないよってエラーになります。
⚠️ The Amplify CLI can NOT find command: sandbox
We are hiring
エムスリーでは AWS や GCP といったパブリッククラウドを活用しています。クラウドエンジニアに限らず、フロントエンドやバックエンド、QA エンジニアも随時募集中です。軽く話を聞いてみるだけでも OK ですので、ぜひともカジュアル面談をお申し込みください!